Showing posts with label projects. Show all posts

11.20.2013

The Master Bedroom & the Evening light...


The late afternoon light on the tree outside my dining room window took my breath away the other day . One of my favorite things about living here is the stunning sunsets.
I have not been able to fully capture its splendor, but it is a lovely way to end the day.


I also have been enjoying my cozy bedroom on these cool nights.
I can finally say that its what I envisioned it to be.
I painted the desk and bed in the same creamy color as my kitchen cabinets.
I used an enamel paint and love the results.


I decided to keep the inside of the desk the stained wood. I love the contrast and
the wood tones tie together with the chair and window blinds.  Keeping it
from looking overly feminine.


I found the duvet cover and shams at the local Goodwill for $24. They were
in perfect condition. After a good wash it added the warmth
and texture I was looking for.
The two decorative pillows, and the area rug were a steal from Ross.
I love Ross pillows because most are down filled with zippers.
The rug is not an expensive rug at all and the quality reflects that, BUT it
was perfect for the bedroom in both color and price. 
Only $59 for a 9x13!


I have carried this print for nearly 20 years! The father of a friend of mine made
the frame and I distressed it and repainted it about 4 times over the years.
I think its perfect now. This image is an honest reflection of
what I love. I feel so much peace looking into it. 


I have thought about repainting the wall color to a neutral. But this room doesn't get
much natural light and the color is cheerful, yet restful for a bedroom.
As much as I don't like the look of a TV in the bedroom, I will
be the first to say I like to watch me some HGTV at night.
It is what it is.


That sweet little chair was another simple reupholster job I tackled.
I decided to keep it in wood tones and the fabric coordinates perfectly.
Here's a peek of that process:


Looking out the master to the hallway. 
This used to be open to the kitchen before we remodeled the kitchen
a few years ago. The mirror and lamp keep it bright.


And... to keep it real...
This is my messy closet! 
The antique doors are leaning because we are trying to figure out
the best way to attach them. Either as sliding barn style or as french doors.
Its funny how you get used to the undone stuff over time!


Maybe I'll go tackle that closet today...
or not. 

*Cheers* to making a room comfy on a tight budget!!

xoxo
Jodi

8.15.2013

It only took 15 years to recover!

I bet you are thinking it took
me 15 years to recover from the embarrassment of my 
previous post!
Maybe.
But this post isn't about mean kids, potty accidents, eating paste,
and chewing pencils to relieve anxiety!

Honest!
This is a story about a chair that had me at Hello
in 1998...or was it 1999...
anyhow, it was a long time ago!

This is the part where I tell you about living in the best neighborhood
EVER to raise children!
... and how there were 21 kids in a 12 house culdesac.
...and how MOST of the families got along amazing.
(Hey I said best, not perfect neighborhood)
Many of us are still very close friends today, and the kids are too!

One of those sweet friends was Uschi.
My lovely German neighbor in the house with the pink trim.
She made the best "Uschi noodle soup" according to Jordon.
Her husband was retired military and they were the oldest couple in our very young family neighborhood.
But they weren't old at all, more like my age now!
But with their children grown up, 
they enjoyed all the activity around them of little children on bikes, scooters
and the constant sounds of boys vs. girls.

Uschi had an adorable house filled with antiques and knick knacks
from Germany. But she loved yard sales and a good deal too!

So, to the point of the story...the chair!
One day we were out hitting the yard sales and I spotted an
Amazing french style chair. 
The upholstery was ratty and greasy at the headrest,
but the legs were curvy and it was a beautiful
feminine chair.
The price tag was $20.

That doesn't seem like much, does it?
But I was a stay home mom at the time, and after our mortgage
and other expenses, we had literally $50 between paychecks for emergencies
or eating out.  So, $20 was way out of my league.
I was soooo sad, but I didn't know the first thing about re upholstering it anyway,
so I had to walk away. 

Uschi loved the chair too, and she bought it.
I was so happy for her because the style would've looked nice in her home.
We lugged it into the truck and hauled it back to her place.

A few weeks, or maybe even months went by
and I still had that chair in the back of my mind, hoping one day to find
another one like it.

Then, one day, my sweet friend flags me down in the culdesac.
"Hey, do you want that chair?  I don't have a place for it."
"REALLY!?"
Yes, yes, and yes!!

She didn't want a dime for it.
I think she may have bought it for me all along.
Her heart is kind and giving, and she remembered what it's like to be financially strapped with a young family. 
I was so happy and grateful to have this ugly duckling beautiful chair!!!


Poor ugly duckling.
She got moved from one room to the next, covered in blankets to hide the fabric
but expose her gorgeous legs. And eventually she was shunned to the garage 
where she was piled with soccer gear, bike parts and sleeping bags.


Awkward...ok just ignore this crazy couple, and you can see her under the white blanket in our living room....
And at another time... you'll see (in the blur)  her tucked away in the corner of our bedroom.

My husband was tired of her.
She was a mess.
Just taking up space.


So, one day last Fall I decided I was going to rescue her 
before she'd be sent away to the thrift store.
I mean, she was part of the family!
15 years with us.

I called around and got estimates from the local upholstery shops.
$900 - $1200
*gasp*


I decided to try it myself, how hard could it be?
I brought her into the living room. 
Then, I stared at her worn out exterior for a few months while 
trying to get the nerve to start.
I used the estimates I'd received to determine the yardage, etc.
I finally purchased the least expensive upholstery grade fabric I could find that I liked.
And I used a 40% off coupon.
 $50 for the fabric. I could live with that.
 Not too expensive.... in case I royally messed her up with my upholstery work.
But God works in mysterious ways.  
As I was getting the fabric cut at the counter I met
a woman and we started to talk.


I do that a lot,
talk to people in lines.
My kids always told me I'm so embarrassing.

"They don't care about your life mom!"

Well, sometimes they do!
Because this lady told me about a class at a different fabric store near my house.
They had a chair re upholstery class for $98!
4 Saturdays for 3 hours...or was it 3 Saturdays for 4 hours?
Anyhow,
Just bring the chair in each week and a professional teaches you how its done!
SOLD! SIGN ME UP!


I forgot her name, the nice lady who saved the day.
I have many friends without names.
Sorry if you are a friend of mine without a name. 
I still love you.

I had the best time learning how to take the chair down to its frame,
tying springs and gluing foam.

Taking her apart, down to just the frame!

Old string on springs. I took this all apart and did it over!

This all came off and was replaced.


Putting her back together again...


I paid the store to make my buttons for the tufting, and I also paid an upholstery shop to make a new cushion & double piping.
I didn't have a heavy duty machine and wanted it to look good.
BUT
I did every.single.part of the rest...
including the tufting in the arms and the back...
All by myself!!

Before the cushion was made and the double piping was put on.


I AM SO PROUD OF THIS CHAIR
All in all, it still cost about $400 to finish.


 Did I mention I'm so proud of this chair?


I willed it to my kids.
Kind of, I mean I wrote on the foam seat with marker.
"Made by mom with Love, Easter 2013"

So that one day...
when she is once again old and ratty and in the garage
and needs a facelift...
My kids will take her apart
and see my message and smile.


I think if you look really close...
She is smiling back.

xoxo
Jodi


6.08.2012

Fresh Vintage Lovely

Hi long lost friends!
I found my way back.
I took the long, scenic route.
The really, really long way.

Don't worry, I packed a lunch
and clean underwear.
You know, just in case I got into an 
accident...
or had one, I suppose.
My mom taught me well.

Along the way, I planted some flowers and pulled weeds.
Had lunch with friends, and dinner out
with my husband.

I snuck home now and then, just long
enough to paint our corner cabinets...
from THIS


to THIS:


They went from Kaka brown to creamy white on the outside
 and a lovely blue inside.


My Grandma's dishes really stand out now.
It's much fresher, I like fresh.

I made a few stops at Lowes, too.
We bought bags and bags of bark to beautify the flower beds in the front.
 We also bought the wood to
make the shutters for the front of the house.
It was under $100 to get the wood and semi solid stain.
Who knew?  We should have done it a long time ago!
We are hanging them this weekend. woo hoo.

It's good to be back.

I have been working on some small projects too..
like making custom vintage inspired bridal garters & bouquets, 
among other things.
I create the flowers and incorporate other vintage flair.
All thoughtfully and lovingly hand made to last!

Here is one I made this week for my friends niece.
Her colors included Coral. 


Have a wonderful weekend!
xoox
Jodi

3.15.2012

Rotten Apple.... Kitchen Before/Afters!!!!!


Hello Bloggy friends, 
or if you are here with me in the Northwest I should say
 SOGGY friends!

So sorry I have been absent for a LONG time!
My Apple (Mac) is being ROTTEN.
There is a short in the screen and so it only opens about 8 inches
before the screen turns black.
So, imagine typing with the laptop on its back (fold) and
resting the keyboard part on your stomach
trying to type straight down ....
and peeking under the top to see what you are actually typing.
I just have to say...its not working well.
Why not just go have it fixed?
Since the kitchen re-do my husband has put us on a 
strict budget....booooo the b word.
But its all for good.
I mean, I have fun money, but I'd rather buy flowers for the yard
or a pretty spring outfit,
ya know what Im sayin girls?
So...in the meantime, I will curl into a pretzel as I write.
Just bare (or is it bear, cuz Im not naked!) with me!

Oh..PINTREST!
I know Im a little late on this boat, but better late than drowning.
I loooooove it.
Will love it even more when I can really SEE the pictures
(see note above...)
I've started a page, I tried to name it fresh vintage home,
but I believe its under my name Jodi Green.
Feel free to follow if you would like,
and at some point I will figure out how to do a pin button on here....
some day....

Now, the kitchen.
These are photo's that my mother in law took a few weeks ago while here. 
Her camera is much better than mine, so I am stealing borrowing
her photo's so you all can REALLY see the difference!
Jeff and I did it all ourselves except for hiring
a plumber to move the sink, and electricians to fix
the crazy wiring, and a handyman to take down the wall
adding a support beam. 
The rest was ALL us.
Anything that is not perfect we call character.
And we will just leave it at that.
ok? K.
Because I love it so much!

Before we moved in:
New sink now here, and wall above is gone


Looking from stove towards the Laundry Room

Note the "hole" under the microwave and doorway to the right that went to the Master & Bathroom

The wall to the left is the wall we partially removed. We kept both china cabinets intact.


Laundry Room when moved in.


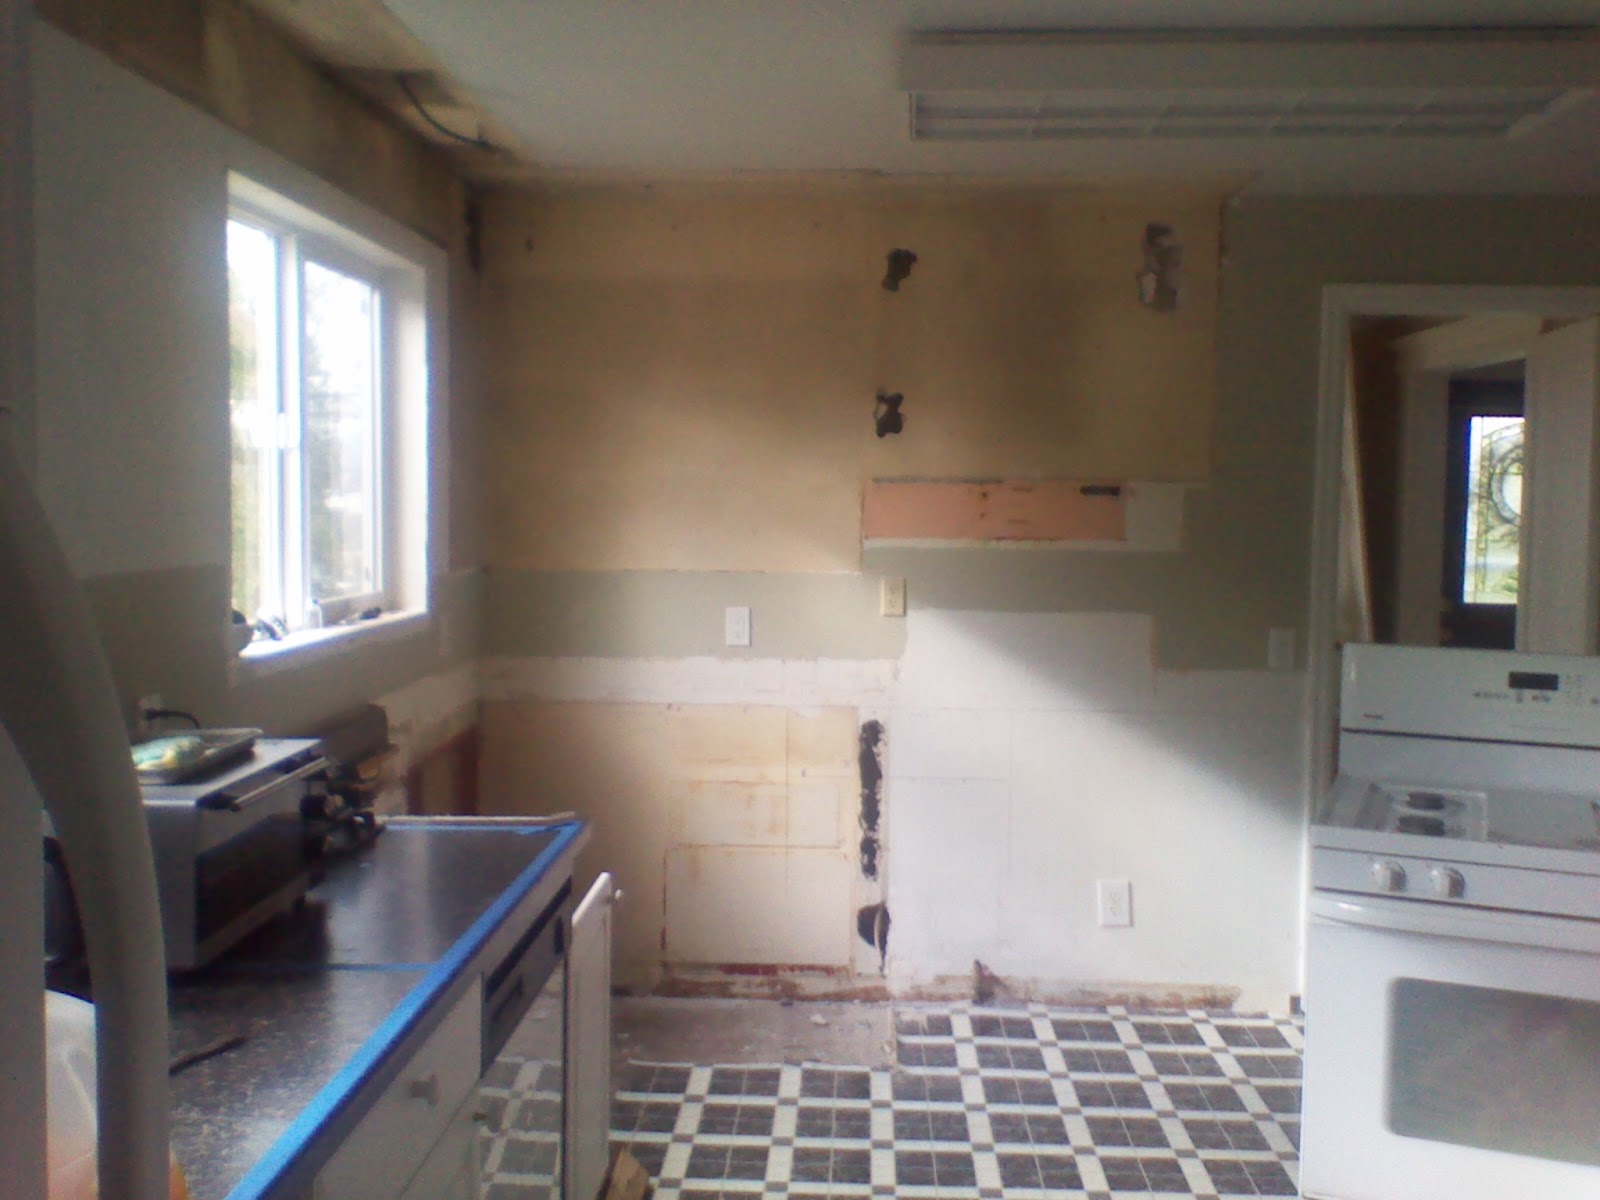
Progress.....We changed some little stuff
and lived with it for a year like this...


I painted the walls a khaki color, painted over the dark grey colored trim, made the alcove into a chalkboard, and covered the hole with a fabric skirt.
The fan was so close to the stove it had melted in spots...yikes.

 The lighting was awful at night, the flooring made us dizzy, and it was so closed off from the rest of the living spaces. The new cabinetry we purchased from Craigslist was custom made for a different kitchen, so we used blue tape on the counters to mark the segments of cabinets.  We had to cut apart one cabinet and also get creative to fill the gaps.


 More piles in the laundry room.  The mess was because we had started to empty out
the armoire and cabinets below.  We had used the large Armoire for small appliances, and the small table for folding laundry.  Jeff had built small shelving for the cans.


Then, with much anticipation, we started to tear things up!
We removed all the stuff from the Laundry room.


As we started to remove the soffit we found a web of wiring that needed to
be professionally redone.


We had to pile kitchen stuff all over the house. This is the corner where we eventually closed off the doorway.


There were so many paint colors and types of wall surfaces. Some cement board,
some drywall, some plaster.


We framed in the doorway between the kitchen and Master bedroom & Bathroom.
It made the hallway darker, but we love the way it makes the area feel like
a master suite!

 The day the wall came down we did a happy dance!  The difference was amazing!

This is from the dining room side looking in. We still needed to change the lighting, flooring, moldings around the windows and opening, counters, etc.

Working on the finishing details....

We bought legs at Lowes, painted them to match, 
and inserted them into the cabinet on each side.
 It worked perfectly.

We installed the laminate tiles with real grouting.  They look real, and are much warmer on our feet.  The cabinets were 30" cabinets, so we had to raise them and install a tall
base board under them.

 Jeff built the moulding for the windows and I primed them before installing them.

 This is one of the butcher block counter tops from Ikea. Its the 1 1/2" Oak.
We had to cut it to fit around the farm sink. After trying to use the router,
Jeff found a chisel and hammer to be the most effective.
We used the sealer recommended at Ikea, but I would like to stain it darker
and put a heavy finish on it.
This is the new counter in the laundry room. We installed the uppers, and
then I refinished a huge dresser & distressed it. Then Jeff added the legs
and countertop.  We also added subway tile, but its not installed yet in this photo.
The breadbox is a gift from my son. He made it for me:)

 We re-hung the antique cabinet in the Laundry room above the washer & dryer.
Jeffs grandpa made it for his mom when she was a little girl. She
kept her doll collection in it.  I loooooove it!

Jeff installing the subway tile in the kitchen.

This is NOW....
 We used a leftover upper cabinet to fill in the hole under the microwave. It holds all my cookbooks and baking dishes as well as baking ingredients. The white wood wainscotting is actually a neighbors pine flooring they were tossing. We primed and painted it to add character. You cant even tell there was a door next to the microwave!


 Looking from the kitchen to the dining room.

 Ok, so I wish the red towel wasnt on the stove here...but thats real life. ha ha.

 Kitchen to laundry room

I'm such a happy girl!
Thank you for stopping by
xoxoxo