Showing posts with label ugly kitchen. Show all posts

3.15.2012

Rotten Apple.... Kitchen Before/Afters!!!!!


Hello Bloggy friends, 
or if you are here with me in the Northwest I should say
 SOGGY friends!

So sorry I have been absent for a LONG time!
My Apple (Mac) is being ROTTEN.
There is a short in the screen and so it only opens about 8 inches
before the screen turns black.
So, imagine typing with the laptop on its back (fold) and
resting the keyboard part on your stomach
trying to type straight down ....
and peeking under the top to see what you are actually typing.
I just have to say...its not working well.
Why not just go have it fixed?
Since the kitchen re-do my husband has put us on a 
strict budget....booooo the b word.
But its all for good.
I mean, I have fun money, but I'd rather buy flowers for the yard
or a pretty spring outfit,
ya know what Im sayin girls?
So...in the meantime, I will curl into a pretzel as I write.
Just bare (or is it bear, cuz Im not naked!) with me!

Oh..PINTREST!
I know Im a little late on this boat, but better late than drowning.
I loooooove it.
Will love it even more when I can really SEE the pictures
(see note above...)
I've started a page, I tried to name it fresh vintage home,
but I believe its under my name Jodi Green.
Feel free to follow if you would like,
and at some point I will figure out how to do a pin button on here....
some day....

Now, the kitchen.
These are photo's that my mother in law took a few weeks ago while here. 
Her camera is much better than mine, so I am stealing borrowing
her photo's so you all can REALLY see the difference!
Jeff and I did it all ourselves except for hiring
a plumber to move the sink, and electricians to fix
the crazy wiring, and a handyman to take down the wall
adding a support beam. 
The rest was ALL us.
Anything that is not perfect we call character.
And we will just leave it at that.
ok? K.
Because I love it so much!

Before we moved in:
New sink now here, and wall above is gone


Looking from stove towards the Laundry Room

Note the "hole" under the microwave and doorway to the right that went to the Master & Bathroom

The wall to the left is the wall we partially removed. We kept both china cabinets intact.


Laundry Room when moved in.


Progress.....We changed some little stuff
and lived with it for a year like this...


I painted the walls a khaki color, painted over the dark grey colored trim, made the alcove into a chalkboard, and covered the hole with a fabric skirt.
The fan was so close to the stove it had melted in spots...yikes.

 The lighting was awful at night, the flooring made us dizzy, and it was so closed off from the rest of the living spaces. The new cabinetry we purchased from Craigslist was custom made for a different kitchen, so we used blue tape on the counters to mark the segments of cabinets.  We had to cut apart one cabinet and also get creative to fill the gaps.


 More piles in the laundry room.  The mess was because we had started to empty out
the armoire and cabinets below.  We had used the large Armoire for small appliances, and the small table for folding laundry.  Jeff had built small shelving for the cans.


Then, with much anticipation, we started to tear things up!
We removed all the stuff from the Laundry room.


As we started to remove the soffit we found a web of wiring that needed to
be professionally redone.


We had to pile kitchen stuff all over the house. This is the corner where we eventually closed off the doorway.
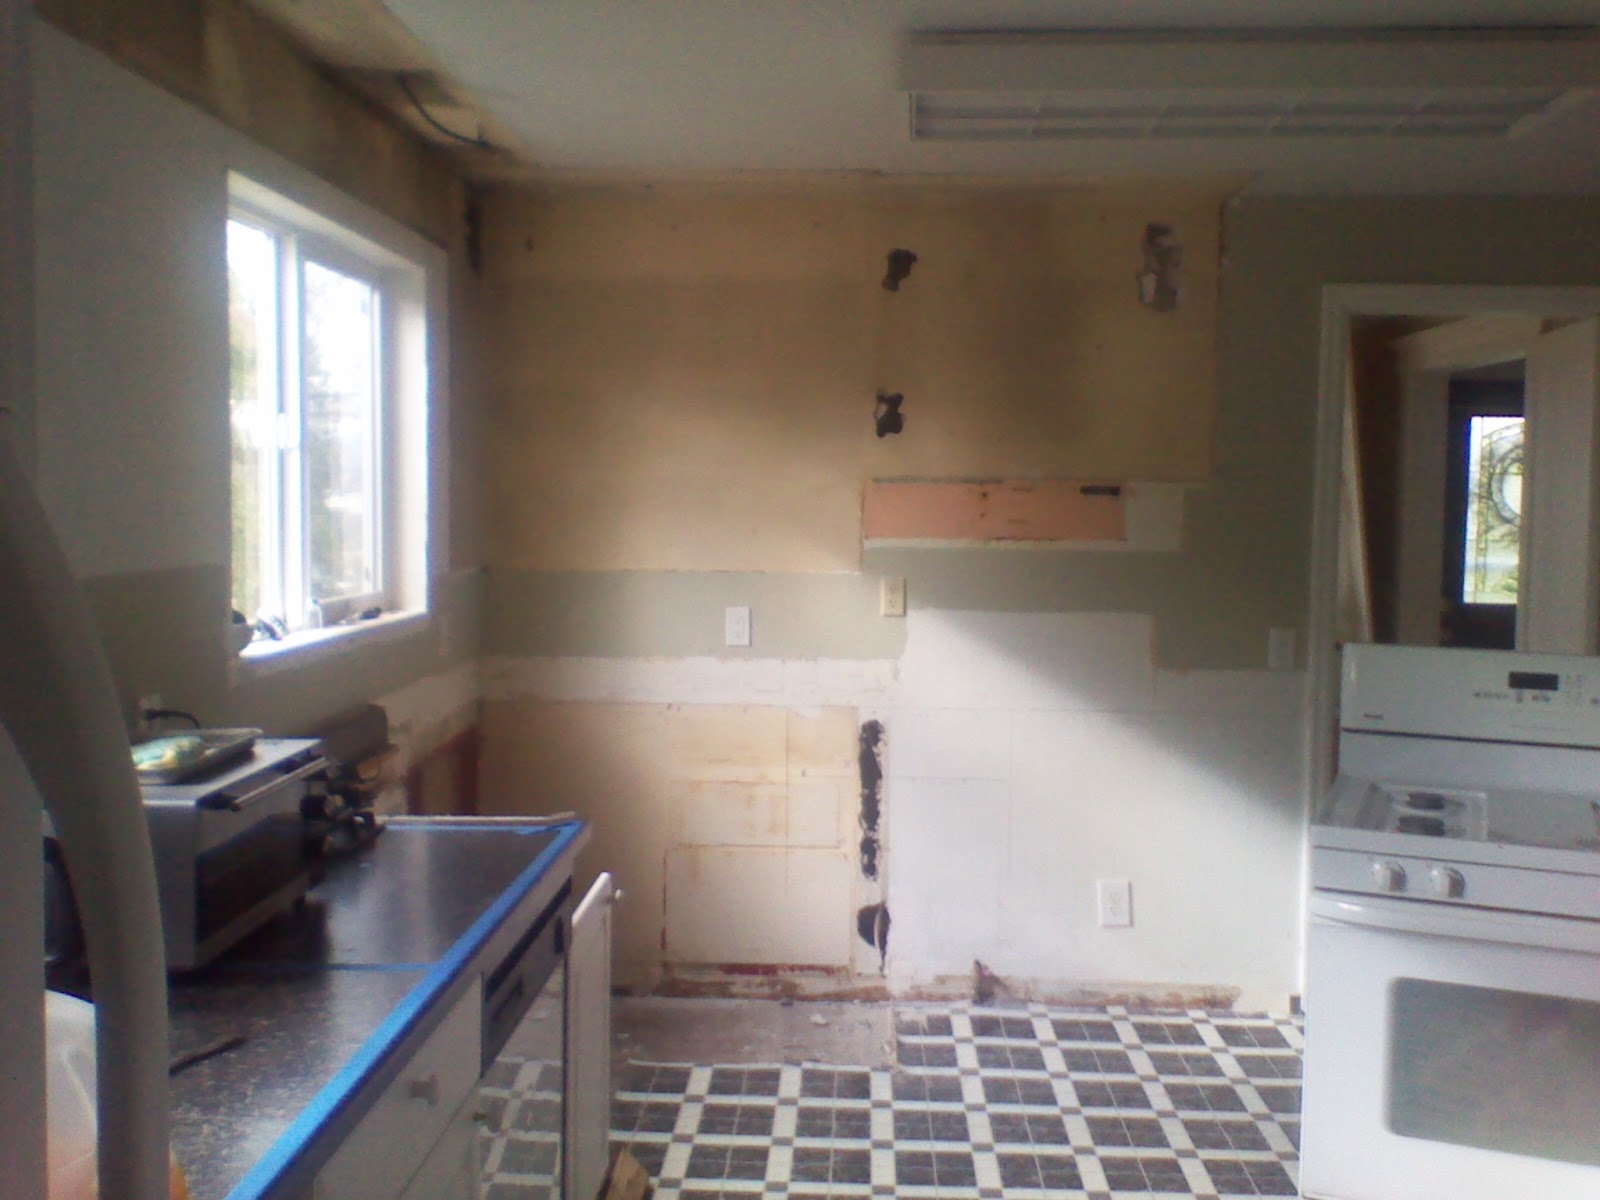

There were so many paint colors and types of wall surfaces. Some cement board,
some drywall, some plaster.


We framed in the doorway between the kitchen and Master bedroom & Bathroom.
It made the hallway darker, but we love the way it makes the area feel like
a master suite!

 The day the wall came down we did a happy dance!  The difference was amazing!

This is from the dining room side looking in. We still needed to change the lighting, flooring, moldings around the windows and opening, counters, etc.

Working on the finishing details....

We bought legs at Lowes, painted them to match, 
and inserted them into the cabinet on each side.
 It worked perfectly.

We installed the laminate tiles with real grouting.  They look real, and are much warmer on our feet.  The cabinets were 30" cabinets, so we had to raise them and install a tall
base board under them.

 Jeff built the moulding for the windows and I primed them before installing them.

 This is one of the butcher block counter tops from Ikea. Its the 1 1/2" Oak.
We had to cut it to fit around the farm sink. After trying to use the router,
Jeff found a chisel and hammer to be the most effective.
We used the sealer recommended at Ikea, but I would like to stain it darker
and put a heavy finish on it.
This is the new counter in the laundry room. We installed the uppers, and
then I refinished a huge dresser & distressed it. Then Jeff added the legs
and countertop.  We also added subway tile, but its not installed yet in this photo.
The breadbox is a gift from my son. He made it for me:)

 We re-hung the antique cabinet in the Laundry room above the washer & dryer.
Jeffs grandpa made it for his mom when she was a little girl. She
kept her doll collection in it.  I loooooove it!

Jeff installing the subway tile in the kitchen.

This is NOW....
 We used a leftover upper cabinet to fill in the hole under the microwave. It holds all my cookbooks and baking dishes as well as baking ingredients. The white wood wainscotting is actually a neighbors pine flooring they were tossing. We primed and painted it to add character. You cant even tell there was a door next to the microwave!


 Looking from the kitchen to the dining room.

 Ok, so I wish the red towel wasnt on the stove here...but thats real life. ha ha.

 Kitchen to laundry room

I'm such a happy girl!
Thank you for stopping by
xoxoxo

11.29.2011

Nuts, snorts, and kitchen update...

Hello!
I'm a little embarrassed.
We are still working LONG and HARD
on our kitchen.
BUT
We are not youngin's anymore.
(shhh, don't say it out loud, I might hear you..
I'm in denial)
and it seems to be taking FOREVER.
Enough about THAT!


I hope you had a wonderful
Thanksgiving Holiday!
My sides still hurt
from the HOURS and HOURS
of laughing hysterically
with my husbands family.
We are very LOUD
when we get together, scary almost.
tears. snorting. howls.
But its the sound of happiness and love.
Intensified.
We are very blessed.
Too bad laughing doesn't burn (enough) calories....

I HAVE to share this story.
On Wednesday,
I asked my husband to please
 stop by the store
 and pick up...

* 3 Artichokes
* a few different color apples
* Mixed nuts
I needed these to decorate the Thanksgiving Table.
I guess I didn't clarify the nuts part
because he helped decorate the table by sprinkling
the nuts....


Ummm, honey, I meant WHOLE nuts.
ha ha ha
I love that guy.


 Although my daughter was
having her very first Holiday away from family.
She is also very blessed.
She has many "other mothers" looking
out for her, and I am Thankful for that!
She had TWO dinners on Thanksgiving day!!
Her facebook post read
"I am never eating again..."
ha ha ha
We missed you Janelle!
I hope you were also LOUD with happiness.

OK...KITCHEN...

Here are our new floors....

It's a heavy laminate tile with some ground stone in it for texture.
We applied real grout in between as per instructions.
Unless you get down and inspect up close,  it looks just like the real thing.
We chose this because we needed a thin floor. A solid tile or wood
was just too thick due to years of other remodels (sub floor).
The idea of pulling up glued down particle board was just too much.
In a perfect world we would've liked to match the oak flooring into the kitchen.
It compliments the cabinets, paint and oak flooring nicely.
The photo looks mauve, but there is NO mauve in this floor. yuck.


We are gathering energy to finish
the laundry room as you read this.

New lighting!


The lighting is from Lowe's.
Jeff finished making the top trim
pieces for the windows...
they are drying and will go up tonight.


 I painted the ceiling a light, light blueish color.
Not for everyone, but on these dark grey winter days it makes 
me smile.
And...no birds will build a nest in here.
*wink*
The crown moulding will go up later, and that will look great!!

Oh, and we are returning this stove
for a different one.
That's a story for another day.
I must start working now...
have a sander in hand and headed for the mystery wall...

xoxoxo
Jodi

11.15.2011

Kitchen Sneak Peek

Good Morning!!

Been busy as beavers over here.

4 weeks....that is how long my house has been in remodeling mode.
We have eaten out about 4 times a week during the process.  I do not
like cooking, but I am so READY to open that box and add water in
my own kitchen. ha ha.


We have a long way til DONE, but we have made a huge dent!
Thankfully not in one of my new appliances!

Here is a sneak peek.


Things we still need to do:

**Paint the ceiling before the new floors go in. (sooooo, guess what I am
doing today???) May need a neck massage tonight.


**Finish putting in the Ikea Butcher block Counter tops.  These are 1 1/2 inch
thick Oak, very affordable, and GORGEOUS! Sadly, when we went to our
Ikea store last weekend, they were OUT OF STOCK with the large size we need
for the peninsula side.  Its OK, we have plenty of other stuff to work on. I just
hope its not going to be January, like they anticipated! If so, I will be driving 
to Portland's Ikea store.

I have a piece of scrap board on the top temporarily. See the sink??? And the dishwasher drawer???
We had to build up the cabinets to make them the right height, but the baseboard will hide that.

**Sink permanently installed, and faucet put in....AFTER counter top.  
Thank goodness for the utility sink! As gross as it is, its still better than having
to use the tub!


**Tile back splash.  This is going to keep the kitchen light. Here is a sample
of what we are doing.  I got these porcelain cream colored subway tiles at my
local Habitat Reuse Store last year. I knew I would use them somewhere!
3 boxes for $5 TOTAL. Yep, you can get great deals at your re-use stores.
For a little bling we are doing a small strip of the glass mini subway tile. The
colors are perfect with the wall, corner cabinets, and stainless.


**Hang new lighting.  I found some great vintage style milk glass fixtures
at our local Lowe's store.  I will show those later.  We had a dimmer added
to the switch (for late night smooching while washing dishes??? ha ha) Anyways,
after 23 years of marriage...a little dimmer switch might be fun!


**Flooring. Obvious.

** And a little surprise on the Chalkboard/microwave/Baking Center wall...
I'm still in the creative process at this point (meaning I'm trying to convince my 
very tired, over-it-already, darling husband that this will add character. 
PLLLLLLEEEEAAAASSSE sweetie xoxoxox) 
Stay tuned for that one.


**Laundry room: new floors to match kitchen,  and dresser turned 
base cabinet (another treat!)


**And many little details that would bore you to tears.

Using cabinets that were custom made for another home has proved to be challenging,
but not as difficult as we expected. We could not use the over-the-refrigerator cabinet (too big) 
so we are figuring that out. Also, we had to cut off (totally destroy!) an end cabinet next
to the built in dishwasher. But you will never know it in the end!


Oh, and I had a surprise visitor yesterday!
I cannot wait to share that story with you!!

So fun, and interesting!


Gotta go earn my keep!
xoxoxo
Jodi


11.05.2011

Glimpse....

Hey Friends!
Im heading out to visit
my besties
on Whidbey Island.
BUT
before I go I thought I would give you a 
GLIMPSE!

This is the hallway between the kitchen and the Master Bedroom,
Bathroom on left, Living room to the right.
We are building a wall here so we can add more cabinets in the
kitchen, and a little more privacy to the bedroom.
I hope its not a decision I will regret
because this side of the house doesn't get much light.
But the extra kitchen space will be nice!

The WALL is down!
There is a HUGE support beam across the top. The contractor did
an amazing job preserving the plaster on this side of the wall!
This is the view from coming in the
front door!
(dining to right, living room to left, stairs straight ahead)
 We left enough of it to support
part of the countertop, and to trim out the opening
to match the other beautiful trim. We also
wanted to preserve the original corner cabinet.
We LOOOOVE how open it feels!

Looking from our Laundry/Pantry toward the front of the house.
There are so many wall finishes at this point, but
today my sweet husband and son are
putting in drywall and insulation.

OH...
and outlets and covers.
Because who knew that the covers and outlets
aren't included in the rewiring???

In case you are terrified with the SpOOky floors,
Halloween is over... and they are coming out!
Clean & creamy colors.

Appliances come NEXT weekend, so we need to be close to done!!!

Hurray :)


Headin' out to catch my ferry~
xoxox
Jodi

10.25.2011

*Charm* update!

Naive
Unrealistic
Childlike Anticipation
Unprepared

All of these words could be used to describe the
person I was when I
saw THE listing for
cabinets on
Craigslist!

Hopeful
Proud
Patient
Impressed

These are the words that could 
best describe me
where we are TODAY.

Hopeful we will finish by Thanksgiving...

Proud *incredibly* of my husband's hard work
especially since he decided
to participate in a racquetball tournament last week.
He didn't expect to keep winning...and playing again
and again.
His shoulder has been in misery every since, but
being the MANLY man he truly is
He man handled those cabinets right off the wall!

Patient...still a work in progress, but hey...

Impressed by...hmm, not sure, oh I know...
Impressed that we have not had
one fight about this!!
ha ha ha
(If you don't count the "discussion" about why
microwaved baked potatoes
 are a great dinner choice....
But the "boys" squished their noses to the idea.
SO Safeway Chinese won)

pssst, fyi....Microwave Baked Potatoes TONIGHT.
NO WHINING.


This is what we started with...


Believe me, it was way worse than it looks in this picture!


Here are the photo's of where we are TODAY.

Gotcha!
I WISH!
ha ha ha
(source)


Removed the cabinet, window trim, part of the bulkhead...

Hmmm, Dealing with remodel ghosts of the past.
Unexpected expense #1
We have submitted permits and have a Electric Company
making a plan to get this fixed.
The holes were there, we think that is how the ghosts wired the outlet above...
The stove WAS there, but you can see Jeff marked where the
new sink will be
(that wall will be sooooo gone)
Hole where the old stove exhaust went outside.
Was the sink....The rest of this side is coming out tonight.
I am currently washing dishes by hand in the paint stained plastic
Utility sink, and resting them on a towel on the washer
to dry.  Not complaining one bit! Nope!
I love this stuff
one of many corners stuffed with kitchen CRAP important items.
breathe, just breathe!!!


Look at all the paint colors, and the flooring ends at the old cabinets.
The walls are plaster folks... hair and all!
Beyond the wall is the dining room...
out that dining room window is a dead on view of the
NEW Manette Bridge that is opening next month.
Maybe we will celebrate together?


The wall will be down this weekend.
THAT will be exciting
(honest, NO sarcasm there, really I just cant wait!)
*goody goody gumdrops*


OH, and we had company from Thursday-Saturday!
*They were very brave*

Now,  I have to run some
errands!!
Paper plates, frozen dinners, plastic forks,
you get the idea!

and sour cream for those baked potatoes....


P.S. Plumber comes tomorrow!
*woot* *woot*


Remember, if you don't want to miss our progress,
sign up on the right for automatic email
notifications. Just enter your email address and
a new post will be delivered automatically;)
I cant even see the email addresses
so its all private.
Thank you for visiting!